Controls Help

MigModel Screen

Menus

File
File Menu 
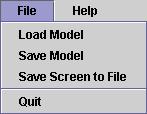
The items in this menu can save your model or exit the program
Load Model
This will load a previously saved model. The model will be used with the current database, even if it was not saved from that database. You will not be able to view the model until you select a database to use it with.
Note: This option is not available when running as an applet because security restrictions prevent the applet from being able to load a file. See Overriding Applet Securities for a way to enable this option
Save Model
This will save the current model.
Note: This option is not available when running as an applet, because security restrictions prevent the applet from being able to save a file. See Overriding Applet Securities for a way to enable this option
Save Screen To File
This will save the current contents of the screen to a JPEG file.
Note: This option is not available when running as an applet, because security restrictions prevent the applet from being able to save a file. See Overriding Applet Securities for a way to enable this option
Quit
Select this option to quit the program
Help
Help Menu 
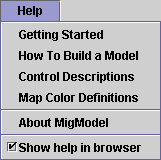
The items in this menu will give you information about how to use this program
Getting Started
This gives a brief introduction to the program and leads you to the other help pages
How To Build A Model
This is a brief tutorial detailing the steps in building a migration model
Control Descriptions
This is a list of each of the controls, and their functions, which you are reading now
Map Color Definitions
This is a brief description of what the colors on the maps mean
About MigModel
This contains copyright, licensing, and contact information
Show help in browser
When this option is checked, these help files will be opened in your browser instead of in a Java window. This is enabled by default, but can be disabled if your browser is incapable of responding to applet requests to show web pages (for example, if your are viewing this with appletviewer).
Note: This option is not available when running as an application, where help must be viewed without a browser.

Other Controls

Model Settings
Model Settings Panel 
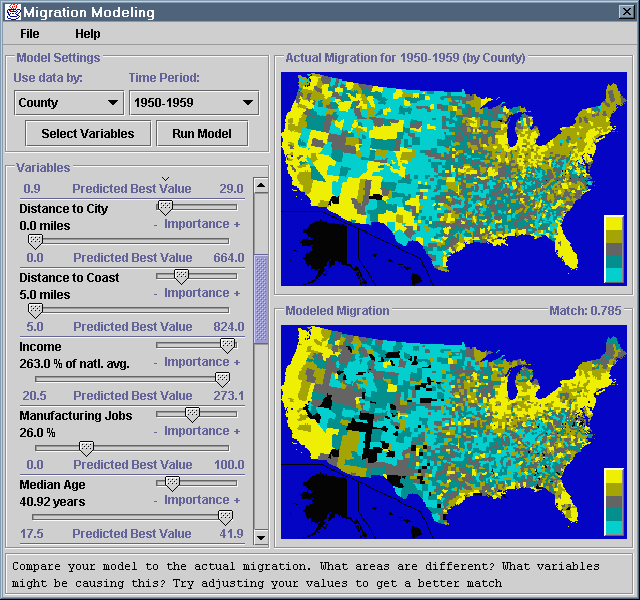
These control what statistics database your model will use, and allow you to set up your model and test it when it is completed
Use data by:
This is a list of the types of regions you can model migration with. You select a region type, such as County or State to get a list of time periods for which data of that type is available.
Time Period:
This is a list of the time periods for which data is available. Once you select a time period from this list, the statistics database for that time period will be loaded, and you can begin creating your model
Select Variables
Select Variables Dialog 
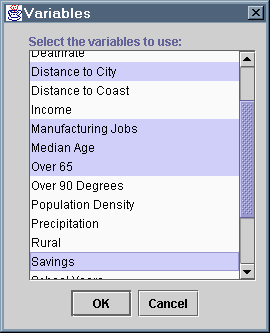
This buttons brings up a dialog that allows you to choose which statistics you want to include in your model. You can select as many statistics as you want from the list. To select an entire range of variables at once, click on the first one in the range, then hold down Shift while clicking on the last one in the range. To toggle whether or not a single variable is selected, without changing the status of any of the others, hold down Ctrl while clicking on that variable.
Run Model
This button will use your current model to predict what migration would have been like during this time period if people behaved as you guessed. A map with the results is then displayed in the lower right-hand corner, and you can compare it with the map of the actual migration in the upper right-hand corner
Variables
Variables Panel 
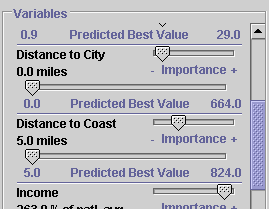
This is where you can view and edit your current model, by changing the Predicted Best Value or Importance of each variable. Each variable has a name, at the upper left, and a Predicted Best Value right below that. There are two sliders, one for adjusting the Predicted Best Value, and one for adjusting the Importance of each variable
Predicted Best Value
This is the the value of each variable you think people would like to have in the place where they choose to live. For instance, if you thought people would prefer to live in the city, you might select a value of 0.0 miles for the Distance to City variable
Importance
This is the importance you attach to each variable relative to all the others. For example, if you set the Predicted Best Value for both the Distance to City and Distance to Coast variables to their minimum values, but set the Importance if the Distance to Coast variable higher, then people would still tend to migrate towards the coast, even if it was not near a city, while a fewer number would migrate towards a city that was farther inland

Prev: How To Build A Model Next: Map Color Definitions